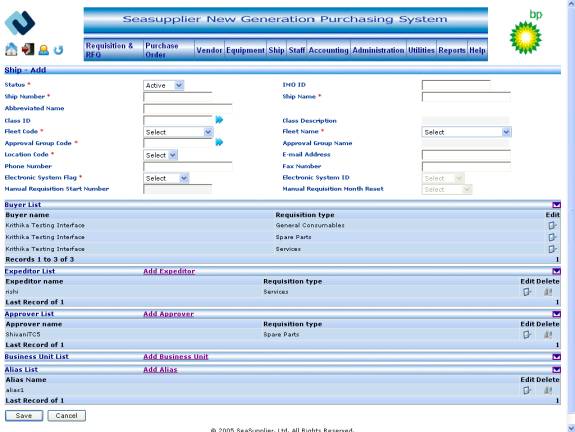
The Add/Edit Ship screen allows the user to add or edit information on ships in the Seasupplier system.
Invoking the screen
To go to the screen click Ship on the main menu and select the Ship – Add/Edit option.
Main Menu > Ship > Ship – Add/Edit
Screen layout
Figure Add/Edit Ship01
Adding new Ship information or editing existing Ship information
Following data should be pre-populated in the system in order to add/edit Ships–
Status
Class ID and Class Description
Fleet Code and Fleet Name
Approval Group Code and Approval Group Name
Location Code
Electronic System Flag
Electronic System ID in case ‘Both’ or ‘Electronic’ is selected as Electronic System Flag
Manual Requisition Start Number in case ‘Both’ or ‘Manual’ is selected as Electronic System Flag
Manual Requisition Month Reset in case ‘Both’ or ‘Manual’ is selected as Electronic System Flag
Following fields are mandatory to add/edit Ship –
Status
Ship Number
Ship Name
Fleet Code
Fleet Name
Approval Group Code
Approval Group Name
Location Code
Electronic System Flag
Buyer
Business Unit
The fields on the add/edit screen are:
Status dropdown
Select the ship status from the status dropdown. The possible values on the Add Ship screen are ‘Active’ and ‘Inactive’ and those on the Edit screen are ‘Active’, ‘Inactive’ and ‘Deletion Pending’. The default status while adding a new ship is ‘Active’
IMO ID textbox
Enter the IMO ID in the IMO ID textbox. The maximum length allowed for the field is 50.
Ship Number textbox
Enter the ship number in the ship number textbox. The maximum length allowed for the field is 9. This is a read-only field on the Edit screen
Ship Name textbox
Enter the ship name in the ship name textbox. The maximum length allowed for the field is 30.
Abbreviated Name textbox
Enter the abbreviated name in the abbreviated name textbox. The maximum length allowed for the field is 10.
Class ID textbox
Click the button to the right of the textbox to access the search Class popup from where you can select the relevant class code or enter a value in the textbox. The pop up displays all the active classes. Maximum length allowed for the field is 5.
Class Description label
This indicates the corresponding class name for the class id chosen in the earlier step. This value gets populated at the time of selecting class id from the Search Class popup.
Fleet Code dropdown
This dropdown displays all the active fleet codes that belong to the customer. Select the fleet code from the fleet code dropdown list. Fleet name automatically gets selected.
Fleet Name dropdown
This dropdown displays all the active fleet names that belong to the customer. Select the fleet name from the fleet name dropdown list. Fleet code automatically gets selected
Approval Group Code textbox
Click the button to the right of the textbox to access the Search Approval Group popup from where you can select the relevant approval group code or enter a value in the textbox. The pop up displays all the active approval groups. Maximum length allowed for the field is 10.
Approval Group Name label
This indicates the corresponding approval group name for the approval group code chosen in the earlier step. This value gets populated at the time of selecting approval group code from the Search Approval Group popup.
Location Code dropdown
This dropdown displays all the active location codes that belong to the customer. Select the location code from the location code dropdown.
E-mail Address textbox
Enter the e-mail address in the e-mail address textbox. The maximum length allowed for the field is 100.
Phone Number textbox
Enter the Phone number in the Phone number textbox. The maximum length allowed for the field is 20.
Electronic System Flag dropdown
Select the electronic system flag from the electronic system flag dropdown list. The possible values are ‘Both’, ‘Manual’, and ‘Electronic’.
Note: If electronic system flag is ‘Both’ then manual requisition start number, electronic system id and manual requisition month reset controls will be enabled.
If electronic system flag is ‘Manual’ then manual requisition start number and manual requisition month reset controls will be enabled.
If electronic system flag is ‘Electronic’ then electronic system id will be enabled.
Electronic System ID dropdown
Select the electronic system id from the electronic system id dropdown list.
Manual Requisition Start Number textbox
Enter the manual requisition start number in the manual requisition start number textbox. The maximum length allowed for the field is 9.
Manual Requisition Month Reset dropdown
Select the manual requisition month reset from the manual requisition month reset dropdown list.
To add Buyer
If you need to attach buyer to the ship, click the Add Buyer link on the Add or Edit ship screen. This invokes the Add/Edit Buyer screen.
To edit Buyer
If you need to edit buyer information displayed in any of the rows in the grid below, click the Edit button at the right hand end of the row. This invokes the Add/Edit Buyer screen where you can edit the information for the selected row.
To add Expeditor
If you need to attach a new expeditor to the ship click the Add Expeditor link on the Add or Edit Ship screen. This invokes the Add/Edit Expeditor screen.
To edit Expeditor
If you need to edit expeditor information displayed in any of the rows in the grid below, click the Edit button at the right hand end of the row. This invokes the Add/Edit Expeditor screen where you can edit the information for the selected row.
To Delete Expeditor
If you need to delete information displayed in any of the rows in the grid below, click the
Delete button at the right hand end of the row.
To add Approver
If you need to attach a new approver to the ship click the Add Approver link on the Add or Edit Ship screen. This invokes the Add/Edit Approver screen.
To edit Approver
If you need to edit approver information displayed in any of the rows in the grid below, click the Edit button at the right hand end of the row. This invokes the Add/Edit Approver screen where you can edit the information for the selected row.
To Delete Approver
If you need to delete information displayed in any of the rows in the grid below, click the
Delete button at the right hand end of the row.
To add Business Unit
If you need to attach a new business unit to the ship click the Add Business Unit link on the Add or Edit Ship screen. This invokes the Add/Edit Business Unit screen.
To edit Business Unit
If you need to edit business unit information displayed in any of the rows in the grid below, click the Edit button at the right hand end of the row. This invokes the Add/Edit Business Unit screen where you can edit the information for the selected row.
To Delete Business Unit
If you need to delete information displayed in any of the rows in the grid below, click the
Delete button at the right hand end of the row.
To add Alias
If you need to add a new alias name for the ship click the Add Alias link on the Add or Edit Ship screen. This invokes the Add/Edit Alias screen.
To edit Alias
If you need to edit Alias information displayed in any of the rows in the grid below, click the Edit button at the right hand end of the row. This invokes the Add/Edit Alias screen where you can edit the information for the selected row.
Note:User can add and edit the alias through the Add/Edit Alias screen only if user adds it through the Add/Edit Alias screen. If the user modifies the ship name, the old name is displayed in the ship alias names list and edit or delete options are not available for it.
To Delete Alias
If you need to delete information displayed in any of the rows in the grid below, click the
Delete button at the right hand end of the row.
Note: This option is available for the alias names added through Add/Edit Alias screen.
To save new Ship information
Click the Save button to save the new ship information details entered. If all the fields are valid, the system will return you to the Search Ship screen with a message that the information you have entered has been added to the system.
To cancel the operation
Click the Cancel button if you wish to exit the screen at any point without adding a ship. The system will return you to the Search ship screen after confirming the same.
Ship Master Maintenance ‑ Add/Edit Buyer screen
The Add/Edit Buyer screen allows the user to add or edit information on buyers for the ship in the Seasupplier system.
Invoking the screen
To go to the screen click Ship on the main menu and select the Ship – Add/Edit option.
Main Menu > Ship > Ship – Add/Edit > Buyer – Add/Edit
Screen layout
Figure Add/Edit Buyer

Following data should be pre-populated in the system in order to add/edit Buyer–
Buyer ID and Buyer Name
Requisition Type
Following fields are mandatory to add/edit Buyer –
Buyer ID
Buyer Name
Requisition Type
The fields on the add/edit screen are:
Buyer ID dropdown
This dropdown displays all the active buyers that belong to the customer Select the buyer id from the buyer id dropdown list. Buyer name automatically gets selected when user selects the buyer id.
Buyer Name dropdown
This dropdown displays all the active buyers that belong to the customer. Select the buyer name from the buyer name dropdown list. Buyer id automatically gets selected when user selects the buyer Name.
Requisition Type label
This dropdown displays all the active buyers that belong to the customer. In Add Buyer screen default Requisition Type is ‘All’. When the user selects a buyer, the same buyers gets attached to all the three requisition types by default.
To save new buyer information
Click the Save button to save the new buyer information details entered for all three requisition types. If all the fields are valid, the system will return you to the Add/Edit Ship screen and added buyer information will display in the buyer List grid.
To cancel the operation
Click the Cancel button if you wish to exit the screen at any point without adding a buyer. The system will return you to the Add/Edit Ship screen.
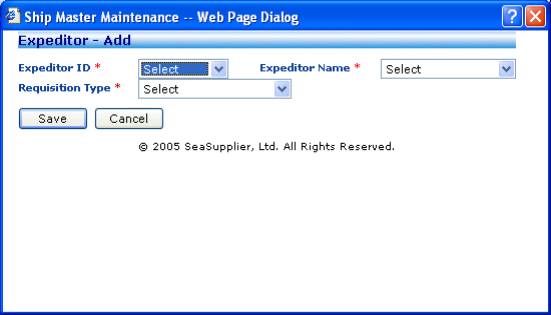
Ship Master Maintenance ‑ Add/Edit Expeditor screen
The Add/Edit Expeditor screen allows the user to add or edit information on expeditor for the ship in the Seasupplier system.
Invoking the screen
To go to the screen click Ship on the Main Menu and select the Ship – Add/Edit option.
Main Menu > Ship > Ship – Add/Edit > Expeditor – Add/Edit
Screen layout
Figure Add/Edit Expeditor
Following data should be pre-populated in the system in order to add/edit Expeditor
Expeditor ID and Expeditor Name
Requisition Type
Following fields are mandatory to add/edit Expeditor –
Expeditor ID
Expeditor Name
Requisition Type
The fields on the add/edit screen are:
Expeditor ID dropdown
This dropdown displays all the active expeditors that belong to the customer. Select the expeditor id from the expeditor id dropdown list. Expeditor Name automatically gets selected when user selects the expeditor id.
Expeditor Name dropdown
This dropdown displays all the active expeditors that belong to the customer. Select the expeditor name from the expeditor name dropdown list. Expeditor id automatically gets selected when user selects the expeditor name.
Requisition Type dropdown
This allows you to select the requisition type. The default value is ‘Select’. Other values namely ‘Spare Parts’, ‘Services’ and ‘General Consumables’.
To save new Expeditor information
Click the Save button to save the new expeditor information details entered. If all the fields are valid, the system will return you to the Add/Edit Ship screen and added expeditor information will display in the expeditor list grid.
To cancel the operation
Click the Cancel button if you wish to exit the screen at any point without adding an expeditor. The system will return you to the Add/Edit Ship screen.
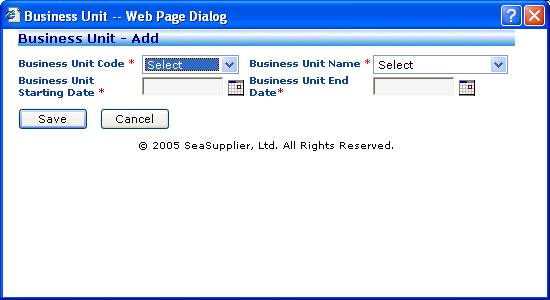
Ship Master Maintenance ‑ Add/Edit Business Unit screen
The Add/Edit Business Unit screen allows the user to add or edit information on business unit for the ship in the Seasupplier system.
Invoking the screen
To go to the screen click Ship on the main menu and select the Ship – Add/Edit option.
Main Menu > Ship > Ship – Add/Edit > Business Unit – Add/Edit
Screen layout
Figure Add/Edit Business Unit
Following data should be pre-populated in the system in order to add/edit Business Unit –
Business Unit Code and Business Unit Name
Following fields are mandatory to add/edit Business Unit–
Business Unit Code
Business Unit Name
Business Unit Starting Date
Business Unit End Date
The fields on the add/edit screen are:
Business Unit Code dropdown
This dropdown list displays all the active business units that belong to the customer. Select the business unit code from the business unit code dropdown list. Business unit name automatically gets selected when user selects the business unit code.
Business Unit Name dropdown
This dropdown list displays all the active business units that belong to the customer. Select the business unit name from the business unit name dropdown list. Business unit code automatically gets selected when user selects the business unit Name.
Business Unit Starting Date textbox
Select the business unit starting date by using the calendar button. This indicates the date from which the business unit is active for the ship.
Business Unit End Date textbox
Select the business unit end date by using the calendar button. This indicates the date till which the business unit is active for the ship.
To save new Business Unit information
Click the Save button to save the new Business Unit information details entered. If all the fields are valid, the system will return you to the Add/Edit ship screen and Added Business Unit information will display in the Business Unit List grid.
To cancel the operation
Click the Cancel button if you wish to exit the screen at any point without adding a business unit. The system will return you to the Add/Edit ship screen.
Ship Master Maintenance ‑ Add/Edit Approver screen
The Add/Edit Approver screen allows the user to add or edit information on approver for the ship in the Seasupplier system.
Invoking the screen
To go to the screen click Ship on the main menu and select the Ship – Add/Edit option.
Main Menu > Ship > Ship – Add/Edit > Approver – Add/Edit
Screen layout
Figure Add/Edit Approver

Following data should be pre-populated in the system in order to add/edit Approver
Approver ID and Approver Name
Requisition Type
Following fields are mandatory to add/edit Approver –
Approver ID
Approver Name
Requisition Type
The fields on the add/edit screen are:
Approver ID dropdown
This dropdown list displays all the active approvers that belong to the customer. Select the approver id from the approver id dropdown list. Approver name automatically gets selected when user selects the approver id.
Approver Name dropdown
This dropdown list displays all the active approvers that belong to the customer. Select the approver name from the approver name dropdown list. Approver id automatically gets selected when user selects the approver name.
Requisition Type dropdown
This allows you to select the requisition type. The default value is ‘Select’. Other values namely ‘Spare Parts’, ‘Services’ and ‘General Consumables’.
To save new Approver information
Click the Save button to save the new Approver information details entered. If all the fields are valid, the system will return you to the Add/Edit Ship screen and added approver information will display in the approver list grid.
To cancel the operation
Click the Cancel button if you wish to exit the screen at any point without adding an approver. The system will return you to the Add/Edit Ship screen.
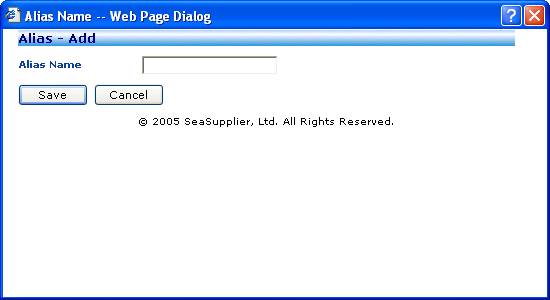
Ship Master Maintenance ‑ Add/Edit Alias screen
The Add/Edit Alias screen allows the user to add or edit information on Alias for the ship in the Seasupplier system.
Invoking the screen
To go to the Add/Edit Alias screen click Ship on the Main Menu and select the Ship – Add/Edit option.
Main Menu > Ship > Ship – Add/Edit > Alias – Add/Edit
Screen layout
Figure Add/Edit Alias
Following fields are mandatory to add/edit Alias –
Alias Name
The fields on the add/edit screen are:
Alias Name textbox
Enter the alias name in the alias name textbox. The maximum length allowed for the field is 30.
To save new Alias
Click the Save button to save the new alias name entered. If the field is valid, the system will return you to the Add/Edit Ship screen and added alias information will display in the alias list grid.
To cancel the operation
Click the Cancel button if you wish to exit the screen at any point without adding an alias. The system will return you to the Add/Edit Ship screen.