PO Receiving is the process, which takes place once the customer starts receiving the requisition items. Receiving for a PO can happen in multiple phases. Also the process enables user to adjust the quantity by providing negative entries.
You can search and filter the list of Purchase Orders (issued for manual requisitions) by providing a search criterion.
PO Search allows you to:
· Search PO
· Print PO
Following users can access the screen functionality in read or write mode based on their profiles-
· Customer Purchasing Admin, Customer Accounting Admin, Customer Approver, Customer Manager, Customer Superintendent, Customer Freight Forwarder, Customer Agent and External Customer Expeditor have Read-only access rights to this screen.
· Customer Super Admin, Customer Super Buyer, Customer Buyer, In-house Customer have read and write access rights to this screen.
Invoking the screen
To go to the screen, click Purchase Order on the main menu and select PO Receiving Manual.
Main Menu > Purchase Order > PO Receiving Manual
Screen layout
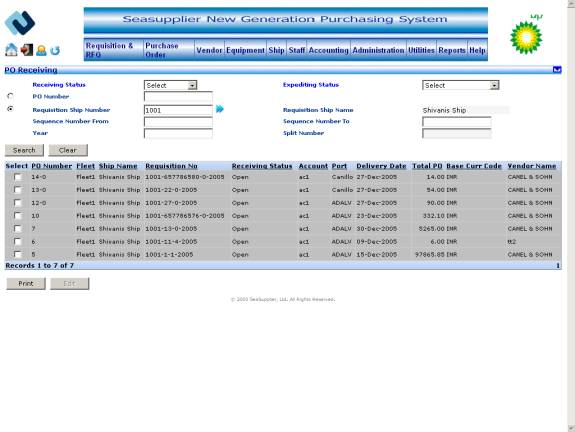
Figure POReceivingAllTypes 01

Figure POReceivingAllTypes_01
Select criteria to search for the relevant PO
The PO Receiving screen shown above allows you to search for the relevant PO and do receiving on the basis of any of the following criteria. These have been described below in detail.
User may enter values in the following fields before going on to select specific search criteria to list POs
Receiving Status dropdown
Select the relevant receiving status from the Receiving Status dropdown list. You may select any of the following receiving status ‘Open’ or ‘Open/Partial’.
Expediting Status dropdown
Select the relevant expediting status from the Expediting Status dropdown list. You may select any of the following expediting status ‘Cancelled’, ‘Completed’, ‘Customs Cleared’, ‘Delivery on board’, ‘In house Expediting’, ‘In Transit’, ‘On Hand’, ‘On Hold’, ‘On Schedule’, ‘Open’, ‘Past Due’, ‘Pending’, ‘Pick Up’, ‘Released’ or ‘Revised Due Date’.
To search by PO Number
Enter PO Number in the PO Number textbox. Maximum length allowed for the field is 90.The option button to the left will get selected on its own.
The user can also search for all relevant POs by entering '*' in the PO Number textbox.
In addition, this field also allows 'like search', where in the user can enter the prefix of a PO number followed by a '*' to display all POs starting with given prefix.
The user can also search for all relevant POs in PO Receiving screen by entering ‘*’ in the textbox. Click the Search button to fetch relevant PO’s in the grid at the bottom of the screen.
To search by a specific Requisition Ship Number
Click the button to the right of the textbox to access the Select Ship popup from where you can select the relevant ship number or enter a value in the textbox. Maximum length allowed for the field is 9.
The pop up displays all the active ships that belong to the customer. You can select the ship number from the records displayed by clicking the relevant option button in the Select column, and then clicking OK. The selected ship number gets displayed in the ship number textbox of the PO Receiving search screen. The option button to the left will get selected on its own.
Click the Search button to fetch relevant PO in the grid at the bottom of the screen.
|
Related Fields Ship Name label This indicates the name of the ship. It gets populated when you select the relevant ship number from the Select Ship popup. Sequence Number From textbox This indicates the Sequence Number From. This field, when entered, further narrows down your search criteria. Maximum length allowed for the field is 9 Sequence Number To textbox This indicates the Sequence Number to. This field, when entered, further narrows down your search criteria. Maximum length allowed for the field is 9 Year textbox This indicates the year. This field, when entered, further narrows down your search criteria. Maximum length allowed for the field is 4 Split Number textbox This indicates the split number. This field, when entered, further narrows down your search criteria. Maximum length allowed for the field is 3 |
To initiate a new search
Click the Clear button to clear the screen. You may now enter different criteria for searching.
To print the PO list
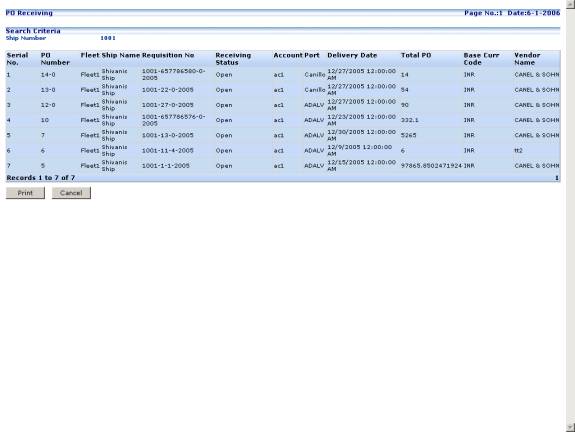
Click the Print button at the bottom to print the information grid. A new window will open up as shown below with the data that will be printed.
Figure POReceivingAllTypes 02

To print the PO list from the Print window
Click the Print button below the grid. The Print modal window will open up to print the screen at the configured printer.
To navigate back to Search PO screen
Click the Cancel button below the grid. The Print screen will close and you will be taken to the Search PO screen.
To edit a PO to do rReceiving
Select the POs by selecting the option button against it. Click the Edit button at the bottom of the grid. PO Receiving Details screen will be displayed.