PO Expediting is the process, which takes place after PO is issued to a Vendor. This involves maintenance of following set of information:
Transit Information
Warehouse Information
PO Expedite allows you to:
· Add Transit Information
· Add Warehouse Information
· View Ship Schedule
· View PO
· Print PO
Following users can access the screen functionality in read or write mode based on their profiles-
· Customer Freight Forwarder, Customer Agent and Customer Consignee have Read-only Access rights to this screen
· Customer Super Admin, In-house Customer Expeditor and External Customer Expeditor have read and write access rights to this screen.
Invoking the screen
To go to the screen, click the Purchase Order on the main menu and select Expedite PO.
Select the relevant POs from the information grid and click the Edit button.
Main Menu > Purchase Order > Expedite PO > Edit button
Screen layout
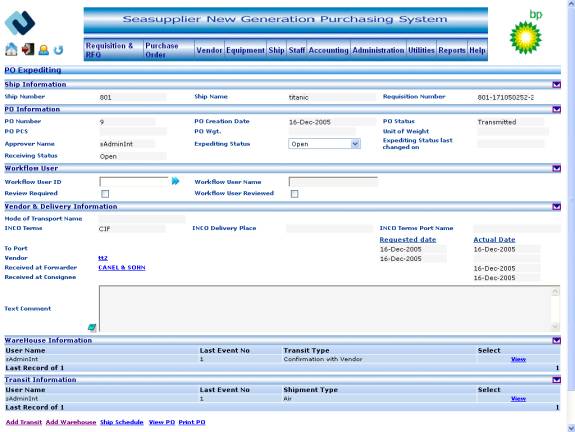
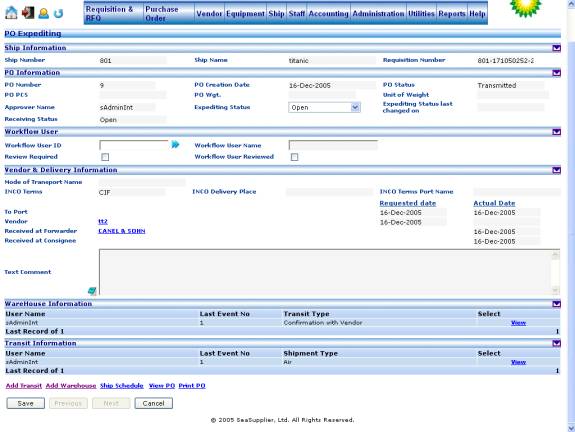
Figure ExpeditePO 03


View the following fields in Ship Information Section
Ship Number label
This indicates the ship number entered while raising the requisition.
Ship Name label
This indicates the ship name entered while raising the requisition.
Requisition Number label
This indicates the requisition number that you selected in the previous step.
View and Edit the following fields in PO information section
PO Number label
This indicates the PO Number.
PO Creation Date label
This indicates the date when PO was created.
PO Status label
This indicates the status of PO.
PO Pieces label
This indicates the total number of pcs in the PO as given by the vendor.
PO Weight label
This indicates the total weight of items in the PO as given by the vendor.
Unit of Weight label
This indicates the unit of measure used to measure the total weight of items in PO.
Approver Name label
This indicates the name of the user who approved the Purchase Order.
Expediting Status dropdown
This indicates the PO Expediting status. You can change this by selecting one of the other options namely ‘Cancelled’, ‘Completed’, ‘Customs Cleared’, ‘Delivery on board’, ‘In house Expediting’, ‘In Transit’, ‘On Hand’, ‘On Hold’, ‘On Schedule’, ‘Open’, ‘Past Due’, ‘Pending’, ‘Pick Up’, ‘Released’, ‘Revised Due Date’.
Expediting Status last changed on label
This indicates the date when expediting status was last changed.
Receiving Status label
This indicates the PO receiving status.
Edit following fields in the Workflow User Information section
Workflow User id textbox
This indicates the workflow user. Click the button to the right of the textbox to access the Select Workflow User popup from where you can select the relevant id. The pop up displays all the active users of the customer. Maximum length allowed for the field is 10.
Workflow User Name label
This indicates the corresponding workflow user name. This field gets populated with the workflow user name when the user selects a workflow user id from the popup in the earlier step.
Review Required checkbox
This checkbox, if checked indicates that workflow user review is required.
Workflow User Reviewed checkbox
This checkbox, when checked indicates that workflow user has reviewed the PO.
View and Edit the following fields in Vendor and Delivery information section
Mode of Transport Name label
This indicates the mode of transport name as given by the vendor.
INCO Terms label
This indicates the INCO terms as given by the vendor.
INCO Delivery Place label
This indicates the INCO delivery place as given by the vendor.
INCO Terms Port Name label
This indicates the INCO port name as given by the vendor.
To Port label
This indicates the delivery port as given by the vendor.
To Port Requested Date
This indicates the delivery date as given by the vendor.
To Port Actual Date
This indicates the last receiving date for either warehouse or transit information, if exists.
Vendor link button
This indicates the name of vendor to whom PO has been issued. Click the link button to view the vendor details.
Vendor Requested Date
This indicates the vendor ready date.
Vendor Actual Date
This indicates the latest date from date picked up/shipped by vendor for transit information.
Received at Forwarder link button
This indicates the freight forwarder name for the PO. Click the link button to view the freight forwarder details.
Received at Forwarder Actual Date
This indicates the last arrival date for either warehouse or transit information, if exists.
Received at Consignee link button
This indicates the consignee name for the PO. Click the link button to view the consignee details.
Received at Consignee Actual Date
This indicates the date at forwarder from transit information.
Text comment
Click the button to the left of text comment field to append the comment.
View following fields in Warehouse information section
User Name label
This indicates the name of the user who is adding warehouse details.
Last Event Number label
This indicates the sequence number for warehouse entries made.
Type label
This indicates the transit type selected while adding warehouse details.
To view Warehouse details
Click the View link in the Select column.
To edit Warehouse details
Click the Edit link in the Select column
View the following fields in Transit information section
User Name label
This indicates the name of the user who is adding transit details.
Last Event Number label
This indicates the sequence number for transit entries made.
Shipment Type label
This indicates the shipment type selected while adding transit details.
To view Transit details
Click the View link in the Select column.
To edit Transit details
Click the Edit link in the Select column
To add transit details
Click the Add Transit link to add or edit transit information.
To add warehouse details
Click the Add Warehouse link to add or edit warehouse information.
To view ship schedule
Click the Ship Schedule link to view the ship schedule.
To view PO
Click the View PO link to view the PO details.
To print PO
Click the Print PO link to print the PO.
To save PO
Click the Save button to save the PO.
To navigate across PO
If you have selected more than one purchase order from the Search screen, the Next and Prev button become visible on the PO Expedite page.
On Click of the Next button , Details pertaining to the next PO are displayed
On Click of the Prev button, Details pertaining to the previous PO are displayed
To go back to Search screen
Click the Cancel button to go back to PO Search screen
PO Expedite – Add Transit Details
Invoking the screen
To go to the screen, click the Purchase Order on the main menu and select Expedite PO.
Select the relevant POs from the information grid and click the Edit button . On the PO Expediting page click the Add Transit link button.
Main Menu > Purchase Order > Expedite PO > Details button > Add Transit Link
Screen layout
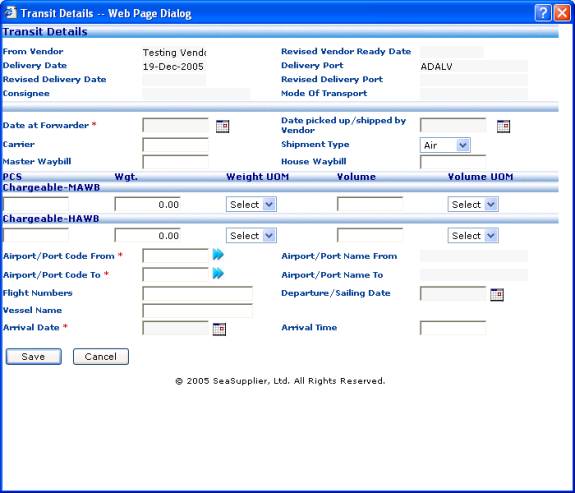
Figure ExpeditePO 04

View the following fields in Transit details section
From Vendor label
This indicates the vendor name to whom the PO has been issued.
Revised Vendor Ready Date label
This indicates the vendor ready date given by the vendor.
Delivery Date label
This indicates the delivery date given by the buyer.
Delivery Port label
This indicates the delivery port given by the buyer.
Revised Delivery Date label
This indicates the delivery date given by the vendor.
Revised Delivery Port label
This indicates the delivery port given by the vendor.
Consignee label
This indicates the consignee name for the PO.
Mode of Transport label
This indicates the mode of transport name as given by the vendor.
Edit the following fields
Date at Forwarder
Date picked up/shipped by vendor
Carrier textbox
This indicates the name of company through which items are coming.
Shipment Type dropdown
This indicates the shipment type. It can have following values: ‘Air’, ’Land’, ’Sea’.
Master Way Bill textbox
This indicates the master air waybill.
House Way Bill textbox
This indicates the house air waybill.
MAWB PCS textbox
This indicates the total pcs in the master air waybill.
MAWB WT textbox
This indicates the total weight in the master air waybill.
MAWB WT UOM dropdown
This indicates the unit of measure of mawb weight.
HAWB PCS textbox
This indicates the total pcs in house air waybill.
HAWB WT textbox
This indicates the total weight in house air waybill.
HAWB WT UOM dropdown
This indicates the unit of measure of hawb weight.
Airport/PortCode from textbox
This indicates the airport/port code from where items were sent. Click the button to the right of the textbox to access the Search Port popup from where you can select the relevant airport/port code.
Airport/Port Name from label
This indicates the Aairport/port name from where items were sent. It gets populated by the corresponding airport/port name if you have chosen a airport/port code from the Search Port popup.
Airport/PortCode To textbox
This indicates the airport/port code where items will be received. Click the button to the right of the textbox to access the Search Port popup from where you can select the relevant airport/port code.
Airport/Port Name To label
This indicates the airport/port name where items will be received. It gets populated by the corresponding airport/port name if you have chosen a airport/port code from the Search Port popup.
Flight Number textbox
This indicate the flight number if shipment type is ‘Air’.
Departure/Sailing Date textbox
This indicates the date when items were departed.
Vessel Name textbox
This indicates the vessel name when shipment type is ‘Sea’.
Arrival Date textbox
This indicates the date when items are received. Select the relevant date by using the calendar control button to the right of the arrival date textbox.
Arrival Time textbox
This indicates the time when items are received.
To save transit information
Click the Save button to save the information.
To cancel the operation
Click the Cancel button to cancel the operation and return to the PO Expediting screen.
PO Expedite – Add Warehouse Details
Invoking the screen
To go to the screen, click the Purchase Order on the main menu and select Expedite PO.
Select the relevant POs from the information grid and click the Edit button . On the PO Expediting page click the Add Warehouse link button.
Main Menu > Purchase Order > Expedite PO > Details button > Add Warehoue Link
Screen layout
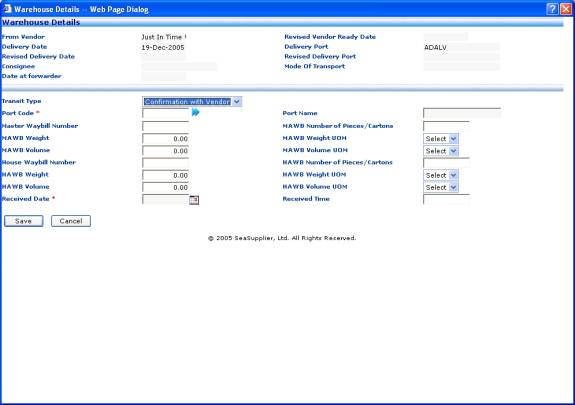
Figure ExpeditePO 05

View the following fields in the Warehouse Details section
From Vendor label
This indicates the vendor name to whom PO has been issued.
Revised Vendor Ready Date label
This indicates the vendor ready date given by the vendor.
Delivery Date label
This indicates the delivery date given by the buyer.
Delivery Port label
This indicates the delivery port given by the buyer.
Revised Delivery Date label
This indicates the delivery date given by the vendor.
Revised Delivery Port label
This indicates the delivery port given by the vendor.
Consignee label
This indicates the consignee name for the PO.
Mode of Transport label
This indicates the mode of transport name as given by the vendor.
Date at Forwarder
This indicates the date entered while adding Transit details.
Edit following fields in the Add Warehouse screen
Transit Type dropdown
This indicates the transit type. It can have following values: ‘Confirmation with Vendor’, ‘Received at Warehouse’.
Port Code textbox
This indicates the airport/port Code where items will be received. Click the button to the right of the textbox to access the Search Port popup from where you can select the relevant airport/port code.
Port Name label
This indicates the Airport/Port Name where items will be received. It gets populated by the corresponding airport/port name if you have chosen a airport/port code from the Search Port popup.
Master Way Bill Number textbox
This indicates the master air waybill.
MAWB Number of Pieces/Cartons textbox
This indicates the total pcs in the master air waybill.
MAWB Weight textbox
This indicates the total weight in the master air waybill.
MAWB Weight UOM dropdown
This indicates the unit of measure of MAWB weight.
MAWB Volume textbox
This indicates the total volume in the master air waybill.
MAWB Volume UOM dropdown
This indicates the unit of measure of MAWB volume.
House Way Bill Number textbox
This indicates the house air waybill.
HAWB Number of Pieces/Cartons textbox
This indicates the total pcs in house air waybill.
HAWB Weight textbox
This indicates the total weight in house air waybill.
HAWB Weight UOM dropdown
This indicates the unit of measure of HAWB weight.
HAWB Volume textbox
This indicates the total volume in house air waybill.
HAWB Volume UOM dropdown
This indicates the unit of measure of HAWB volume.
Received Date textbox
This indicates the date when items are received. Select the relevant date by using the calendar control button to the right of the received date textbox.
Received Time textbox
This indicates the time when items are received.
To save warehouse information
Click the Save button to save the information.
To cancel the operation
Click the Cancel button to cancel the operation and return to the PO Expediting screen.