Customer Purchasing Admin, Customer Super Buyer and Customer Buyer have read and write access rights to this screen.
Invoking the screen
To go to the screen click Requisition & RFQ on main menu and select Generate Pro-forma PO.
Main Menu > RFQ Display – Generate Pro-forma PO image button
Main Menu > Quote Comparator – Generate Pro-forma PO image button
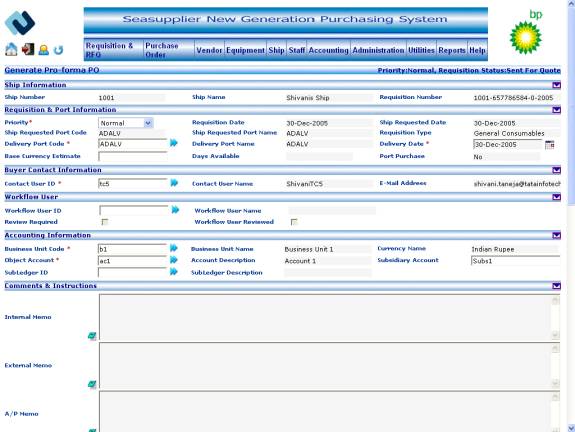
Figure Generate
Pro-forma PO 02
Figure Generate Pro-forma PO 03
Figure Generate Pro-forma PO 04

The following data should be pre-populated in the system in order to Generate Pro-forma PO
Priority
Users
Port code
Mode of Transport
INCO Terms
INCO Port Code
INCO Delivery Place
Vendor
Freight Forwarder
Consignee
Agent
Accounting Information
The following fields will be displayed at the top of the screen
Priority label
This indicates the priority of the requisition.
Requisition Status label
This indicates the status of the requisition
View the following fields in the Ship Information section
Ship Number label
This indicates the ship number entered while raising the requisition.
Ship Name label
This indicates the ship name entered while raising the requisition.
Requisition Number label
This indicates the requisition number or RFQ number that you selected in the previous step.
View and edit the following fields in the Requisition & Port Information section
Priority dropdown
This indicates the priority of the pro-forma po. You can change this by selecting other values from the dropdown list.
Requisition Date label
This indicates the date the requisition was raised.
Ship Requested Date label
This indicates ship requested date.
Ship Requested Port Code label
This indicates the ship requested port code.
Ship Requested Port Name label
This indicates the ship requested port name.
Requisition Type label
This indicates the requisition type.
Delivery Port Code textbox
This indicates the delivery port code. Click the button to the right of the textbox to access the Search Port popup from where you can select the relevant port code or enter a value in the textbox. The popup displays all the active ports. Maximum length allowed for the field is 5.
Delivery Port Name label
This indicates the corresponding port name for the port id chosen in the earlier step. This value gets populated at the time of selecting port code from the Search Port popup.
Delivery Date textbox
This indicates the delivery date. Click the button to the right of the textbox to access the calendar control from where you can change the delivery date. This should be greater than or same as current date.
Base Currency Estimate textbox
This indicates the base currency estimated. The maximum length allowed for the field is 15 (12 digits before the decimal and 2 digits after the decimal).
Days Available label
This indicates the number of days available for delivery. This is the difference of the days between the delivery date and current date.
Port Purchase label
This indicates if the requisition is a port purchased requisition or not.
The following fields are mandatory under this header
Priority
Delivery Port Code
Delivery Date
View and edit the following fields in the Buyer Contact Information section
Contact User ID textbox
This indicates the contact user id. Click the button to the right of the textbox to access the Search Contact User popup from where you can select the relevant user id or enter a value in the textbox. The popup displays all the active users. Maximum length allowed for the field is 10.
Contact User Name label
This indicates the corresponding contact user name for the contact user id chosen in the earlier step. This value gets populated at the time of selecting contact user id from the Search contact user popup.
E-mail Address label
This indicates the corresponding e-mail address for the contact user id chosen in the earlier step. This value gets populated at the time of selecting contact user id from the Search contact user popup.
The following fields are mandatory under this header
Contact User ID
View and edit the following fields in the Workflow User section
Workflow User ID textbox
This indicates the workflow user id. Click the button to the right of the textbox to access the Search Workflow User popup from where you can select the relevant user id or enter a value in the textbox. The popup displays all the active users. Maximum length allowed for the field is 10.
Workflow User Name label
This indicates the workflow user name for the workflow user id chosen in the earlier step. This value gets populated at the time of selecting workflow user id from the Search Workflow User popup.
Review Required checkbox
This indicates if the review of requisition or RFQ is mandatory by the attached workflow user. If review required checkbox is checked then you can’t generate pro-forma PO from the corresponding requisition or RFQ until the attached workflow user reviews the requisition or RFQ and checks the workflow user reviewed checkbox.
Workflow User Reviewed checkbox
This indicates if the attached workflow user has reviewed the requisition or not.
View and edit the following fields in the Accounting Information section
Business Unit Code textbox
This textbox indicates the business unit code. Click the button to the right of the textbox to access the Select Business Unit popup from where you can select the relevant business unit code or enter a value in the textbox. The popup displays all the valid active business units attached to the requisition ship number. Maximum length allowed for the field is 12.
Business Unit Name label
This indicates the business unit name for the business unit chosen in the earlier step. This value gets populated at the time of selecting business unit code from the Search Business Unit popup.
Currency Name label
This indicates the base currency of the company. This value gets populated at the time of selecting business unit code from the Search Business Unit popup.
Object Account textbox
This textbox indicates the object account code. Click the button to the right of the textbox to access the Select Object Account popup from where you can select the relevant object account code or enter a value in the textbox. The popup displays all the active object accounts that are attached to the business unit code selected in the above step. Maximum length allowed for the field is 6.
Account Description label
This indicates the object account description for the object account chosen in the earlier step. This value gets populated at the time of selecting object account from the Search Object Account popup.
Subsidiary Account textbox
This indicates the subsidiary account code. This value gets populated at the time of selecting object account from the Search Object Account popup.
SubLedger ID textbox
This textbox indicates the subledger id. Click the button to the right of the textbox to access the Select SubLedger popup from where you can select the relevant subledger id or enter a value in the textbox. The popup displays all the active subledger id. Maximum length allowed for the field is 10.
SubLedger Description label
This indicates the subledger description for the subledger id chosen in the earlier step. This value gets populated at the time of selecting subledger id from the Search SubLedger popup.
The following fields are mandatory under this header
Business Unit Code
Object Account Code
View and edit the following fields in the Comments & Instructions section
Internal Memo textarea
This textarea indicates the internal memo text. Click the button to the left of the textarea to append relevant text.
External Memo textarea
This textarea indicates the external memo text. Click the button to the left of the textarea to append relevant text.
A/P Memo textarea
This textarea indicates the a/p memo text. Click the button to the left of the textarea to append relevant text.
Delivery Instructions textarea
This textarea indicates the delivery instructions text. You can enter the text in this textarea.
Special Instructions textarea
This textarea indicates the special instructions text. You can enter the text in this textarea.
View and edit the following fields in the Vendor & Delivery Information section
Vendor ID label
This indicates the vendor id. If you are generating pro-forma po corresponding to a requisition then you need to select the vendor through Select Vendors link button or E-quote Vendors link buttons. If you are generating pro-forma PO corresponding to a RFQ then the Vendor ID is displayed in the Vendor ID label and Select Vendors and E-quote Vendors link buttons are disabled.
Vendor Name label
This indicates the vendor name for the vendor id chosen in the earlier step. This value gets populated at the time of selecting vendor id from the Select Vendors or E-quote Vendors.
Currency Name label
This indicates the vendor currency name. This value gets populated at the time of selecting vendor id from the Select Vendors or E-quote Vendors. If that customer has set up more than one currency for the vendor selected above then you can select the currency by clicking on the button to the right of the label. This will bring up the Select Vendor Currency popup from where you can select the relevant currency.
Contact Name label
This indicates the contact name for the vendor id chosen in the earlier step. Click the button to the right of the label to access the Select Vendor Contact popup from where you can select the relevant contact name. The popup displays all the active contact names for the selected vendor.
Method of Transmission dropdown
This indicates the method of transmission for the vendor id chosen in the earlier step. You can choose the relevant method from the dropdown.
Vendor Lead Time label
This indicates the vendor lead time. If you are generating pro-forma po against an RFQ then this will indicate the lead time in days, if entered while submitting quote by vendor.
Vendor Quote ID label
This indicates the vendor quote id. If you are generating pro-forma po against a RFQ then this will indicate the quote id, if entered when vendor submitted the quote.
Vendor Ready Date label
This indicates the vendor ready date. Click the button to the right of the textbox to access the calendar control from where you can change the vendor ready date. This should be greater than or same as current date.
Mode of Transport Code textbox
This indicates the mode of transport code. Click the button to the right of the textbox to access the Select Mode of Transport popup where you can select the relevant mode of transport code or enter a value in the textbox. The popup displays all the active mode of transport that belongs to the customer. Maximum length allowed for the field is 8.
Mode of Transport Name label
This indicates the mode of transport name for the mode of transport code chosen in the earlier step. This value gets populated at the time of selecting mode of transport code from the Select Mode of Transport.
INCO Terms dropdown
This indicates the INCO Terms. You can select the appropriate INCO terms from the INCO terms dropdown.
INCO Port Code textbox
This indicates the INCO port code. Click the button to the right of the textbox to access the Search Port popup where you can select the relevant port code or enter a value in the textbox. The popup displays all the active port codes. Maximum length allowed for the field is 5.
INCO Port Name label
This indicates the INCO port name for the INCO port code chosen in the earlier step. This value gets populated at the time of selecting INCO port code from the Select Port popup.
INCO Delivery Place Code textbox
This indicates the INCO delivery place code. Click the button to the right of this textbox to access the Select INCO Delivery Place popup where you can select the relevant delivery place code or enter a value in the textbox. The popup displays all the active delivery place code. Maximum length allowed for the field is 5.
INCO Delivery Place label
This indicates the INCO delivery place for the INCO delivery place code chosen in the earlier step. This value gets populated at the time of selecting INCO delivery place code from the Select INCO Delivery Place popup.
Freight Forwarder ID textbox
This indicates the freight forwarder id. Click the button to the right of this textbox to access the Select Freight Forwarder popup where you can select the relevant freight forwarder or enter a value in the textbox. The popup displays all the active freight forwarder that belongs to the customer. Maximum length allowed for the field is 9.
Freight Forwarder Name label
This indicates the freight forwarder name for the freight forwarder id chosen in the earlier step. This value gets populated at the time of selecting freight forwarder id from the Select Freight Forwarder popup.
Consignee ID textbox
This indicates the consignee id. Click the button to the right of this textbox to access the Select Consignee popup where you can select the relevant consignee or enter a value in the textbox. The popup displays all the active consignees that belong to the customer. Maximum length allowed for the field is 9.
Consignee Name label
This indicates the consignee name for the consignee id chosen in the earlier step. This value gets populated at the time of selecting consignee id from the Select Consignee popup.
Agent ID textbox
This indicates the agent id. Click the button to the right of this textbox to access the Select Agent popup where you can select the relevant agent or enter a value in the textbox. The popup displays all the active agents that belong to the customer. Maximum length allowed for the field is 9.
Agent Name label
This indicates the agent name for the agent id chosen in the earlier step. This value gets populated at the time of selecting agent id from the Select Agent popup.
Total Weight textbox
This indicates the total weight of the items. You can change the total weight value by entering the value in the total weight textbox.
Weight UOM dropdown
This indicates the unit of measure for the weight entered in the above step. You can select the appropriate unit of measure from the unit of measure dropdown that contains all the active unit of measures for weight.
The following fields are mandatory under this header
Vendor ID
Currency Name
Method of Transmission
View the following fields in the Equipment Information section
Equipment ID label
This indicates the equipment id of the header level equipment.
Equipment Name label
This indicates the equipment name of the header level equipment.
Equipment Category label
This indicates the equipment category of the header level equipment.
Equipment Priority label
This indicates the equipment priority of the header level equipment.
Manufacturer ID label
This indicates the manufacturer id of the header level equipment.
Manufacturer Name label
This indicates the manufacturer name of the header level equipment.
Equipment Drawing Number label
This indicates the equipment drawing number of the header level equipment.
Equipment Serial Number label
This indicates the equipment serial number of the header level equipment.
Model/Type label
This indicates the equipment model/type of the header level equipment.
Equipment Description
This indicates the equipment description of the header level equipment.
View and edit the following fields in the Line Information section
Line no. textbox
This indicates the line no. in the grid. This is a read only field.
Quantity textbox
This indicates the quantity of the respective item. The maximum length allowed for the field is 11 (7 digits before the decimal and 3 digits after the decimal).
UOM dropdown
This indicates the unit of measure of the respective item. You can select a value from the dropdown list that contains the active unit of measures.
Description textbox
This indicates the description pertaining to the line item. This is a read only field if the corresponding requisition was created electronically. This field will be editable if the corresponding requisition was created manually.
Item ID textbox
This indicates the item id of the item present in the line item. This is a read only field. For the line items which have been entered without using item master this field will be blank.
Cost textbox
This indicates the unit cost of the line item. The maximum length allowed for the field is 15 (12 digits before the decimal and 2 digits after the decimal).
Extended Cost label
This indicates the extended cost of the line item. It contains the value for Quantity * Unit Cost.
Flag dropdown
This indicates the flag of the line item whether Safety, Hazardous or Perishable.
Cert. Reqd. checkbox
This checkbox allows you to indicate whether certificate is required or not.
Price Type textbox
This indicates the price type of the line item. By Default it should be blank, possible values are M, C, Q, D, A (Manual, Contracted, Quoted, Overridden by Vendor, catalogue price). This is a read only field.
Currency textbox
This is indicates the currency code for the price entered in the unit cost field. This is a read only field.
To view the image of an item
Click the Image button to view an image of the item. If available, it opens the image in a popup.
Generate Pro-forma PO – Line Item Details
Invoking the screen
To go to the screen, click the Requisition & RFQ on the main menu and select Generate Pro-forma PO - Details - Line Item Details option.
Main Menu > Requisition & RFQ > Generate Pro-forma PO > Details - Line Item Details
Screen Layout
Figure Generate
Pro-forma PO 05 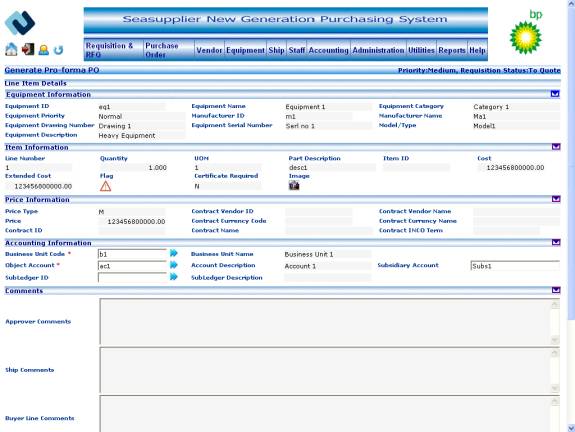
Figure Generate
Pro-forma PO 06 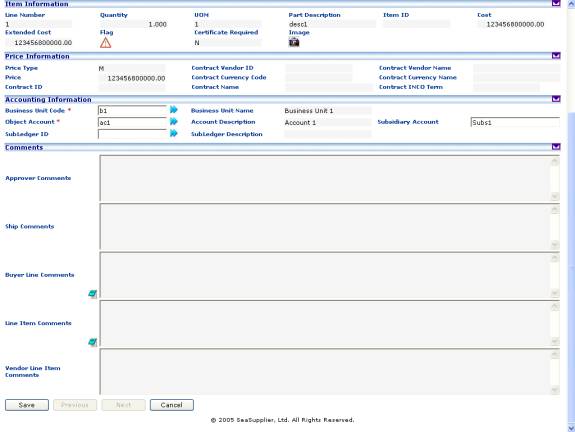
View the following fields in Equipment Information section
Equipment ID label
This indicates the equipment id of equipment.
Equipment Name label
This indicates the name of the equipment.
Equipment Category label
This indicates the equipment category
Equipment Priority label
This indicates the equipment priority.
Manufacturer ID label
This indicates the manufacturer id.
Manufacturer Name label
This indicates the manufacturer name.
Equipment Drawing Number label
This indicates the equipment drawing number
Equipment Serial Number label
This indicates the equipment serial number
Model/Type label
This indicates the equipment model/type.
Equipment Description label
This indicates the equipment description.
View the following fields in Item Information section
Line Number label
This indicates the Line number of the item selected from the line items grid.
Quantity label
This indicates the quantity of the item selected from the line items grid.
UOM label
This indicates the unit of measure of the item selected from the line items grid.
Part Description label
This indicates the description of the item selected from the line items grid.
Item ID label
This indicates the item id of the item selected from the line items grid.
Cost label
This indicates the unit cost of the item selected from the line items grid.
Extended Cost label
This indicates the extended cost of the item selected from the line items grid.
Flag label
This indicates the flag of the item selected from the line items grid.
Certificate Required
This indicates certificate information of the item selected from the line items grid.
Image
Click the Image button to view an image of the item. If available, it opens the image in a popup.
View the following fields in Price Information section
Price Type label
This indicates the price type of the item selected from the line items grid. Possible values are M, C, Q, D or A (Manual, Contracted, Quoted, Overridden by Vendor, catalogue price).
Contract Vendor ID label
This indicates the contract vendor id of the item selected from the line items grid.
Contract Vendor Name label
This indicates the contract vendor name of the requisitioned item selected from the line items grid.
Price label
This indicates the price of the item selected from the line items grid.
Contract Currency Code label
This indicates the contract currency code of the item selected from the line items grid.
Contract Currency Name label
This indicates the contract currency name of the item selected from the line items grid.
Contract ID label
This indicates the contract id of the item selected from the line items grid.
Contract Name label
This indicates the contract name of the item selected from the line items grid.
Contract INCO Term label
This indicates the contract INCO term of the item selected from the line items grid.
View and Edit the following fields in Accounting Information section
Business Unit Code textbox
This textbox indicates the business unit code of the item selected from the line items grid. Click the button to the right of the textbox to access the Select Business Unit popup from where you can select the relevant business unit code or enter a value in the textbox. The popup displays all the valid active business units attached to the requisition ship number. Maximum length allowed for the field is 12.
Business Unit Name label
This indicates the business unit name for the business unit chosen in the earlier step. This value gets populated at the time of selecting business unit code from the Search Business Unit popup
Object Account textbox
This textbox indicates the object account code of the line item selected from the line items grid. Click the button to the right of the textbox to access the Select Object Account popup from where you can select the relevant object account code or enter a value in the textbox. The popup displays all the active object accounts that are attached to the business unit code selected in the above step. Maximum length allowed for the field is 6.
Account Description label
This indicates the object account description for the object account chosen in the earlier step. This value gets populated at the time of selecting object account from the Search Object Account popup.
Subsidiary Account textbox
This indicates the subsidiary account code of the item selected from the line items grid. This value gets populated at the time of selecting object account from the Search Object Account popup.
SubLedger ID textbox
This textbox indicates the subledger id of the item selected from the line items grid. Click the button to the right of the textbox to access the Select SubLedger popup from where you can select the relevant subledger id or enter a value in the textbox. The popup displays all the active subledger id. Maximum length allowed for the field is 10.
SubLedger Description label
This indicates the subledger description for the subledger id chosen in the earlier step. This value gets populated at the time of selecting subledger id from the Search SubLedger popup.
The following fields are mandatory under this header
Business Unit Code
Object Account
View and Edit the following fields in Comments section
Approver Comments textarea
This textarea indicates the approver comments text. This is readonly textarea.
Ship Comments textarea
This textarea indicates the ship comments text. This is readonly textarea.
Buyer Line Comments textarea
This textarea indicates the buyer line comments text. Click the button to the left of the textarea to append relevant text.
Line Item Comments textarea
This textarea indicates the line item comments text. Click the button to the left of the textarea to append relevant text.
Vendor Line Item Comments textarea
This textarea indicates the vendor line item comments text. This is readonly textarea.
To view the details of Next Item
Click the Next button to view the details of the next line item. If you are at the last item then this button will be disabled.
To view the details of the Previous Item
Click the Previous button to view the details of the previous line item. If you are at the first item then this button will be disabled.
To save the Line Item Details
Click the Save button to save the line item details. If all the fields are valid, the system will return you to the Generate Pro-forma PO screen.
To cancel the operation
Click the Cancel button to cancel the operation. The system will return you to the Generate Pro-forma PO screen.
To Print Requisition
Click the Print Requisition link button at the bottom left of the screen. This will print the Requisition.
To Print RFQ
Click the Print RFQ link button at the bottom left of the screen. This will print the RFQ.
Generate Pro-forma PO – Select Vendor
Invoking the screen
To go to the screen, click the Requisition & RFQ on the main menu and select Generate Pro-forma PO – Select Vendor.
Main Menu > Requisition & RFQ > Generate Pro-forma PO > Select Vendor
It opens the Select Vendor screen as popup window.
Screen Layout
Figure Select Vendor 01
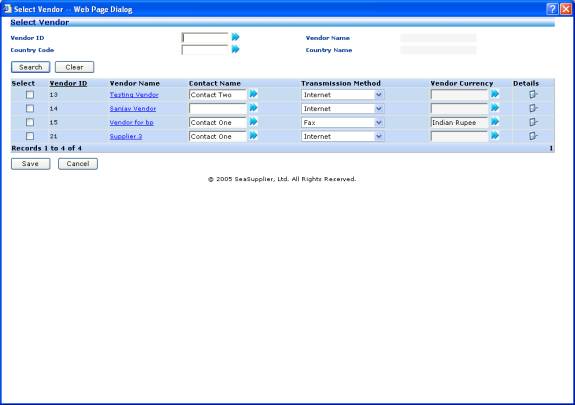
By default select vendor screen displays all the vendors that have relationship with the customer and have the purchasing service
To search and fetch the Vendors
You can search the Vendor details based on the Country code and Vendor ID.
View and edit the following fields in grid
Vendor Id label
This indicates vendor id.
Vendor Name link button
This indicates vendor name. Click on the vendor name link button to access the vendor details popup where you can see the complete details of the vendor.
Contact Name textbox
This indicates vendor contact name. This textbox gets populated on its own if the vendor in the corresponding grid row has only one contact or has a primary contact for the delivery port code. If the vendor has more than one contact or not primary contact then click the button to the right of the textbox to access the Select Vendor Contact popup from where you can select the relevant contact name.
Transmission method Name dropdown
This indicates transmission method name. You can select transmission method from dropdown list.
Vendor Currency textbox
This indicates vendor currency. This textbox gets populated on its own if the vendor in the corresponding grid row has only one currency. If the vendor has more than one currency then click the button to the right of the textbox to access the Select Currency popup from where you can select the relevant vendor currency.
Note: Vendors having the purchasing service and relationship with customer and financial service will be displayed in the black font remaining vendors will be displayed in red font
To Display Vendor Details
Click on the Details image button or Vendor Name link button to open vendor details popup.
Select the vendor to generate pro-forma PO
Select the vendor by checking the check box. Click Save button to save the information and this takes you back to the Generate Pro-forma PO screen.
To cancel the operation
Click the Cancel button to cancel the operation. System will take you back to the Generate Pro-forma screen.
Generate Pro-forma PO – Equote Vendors
Invoking the screen
To go to the screen, click the Requisition & RFQ on the main menu and select Generate Pro-forma PO – Equote Vendor.
Main Menu > Requisition & RFQ > Generate Pro-forma PO > Equote Vendor
It opens the Equote Vendor screen as popup window.
Screen Layout
Figure Equote Vendor
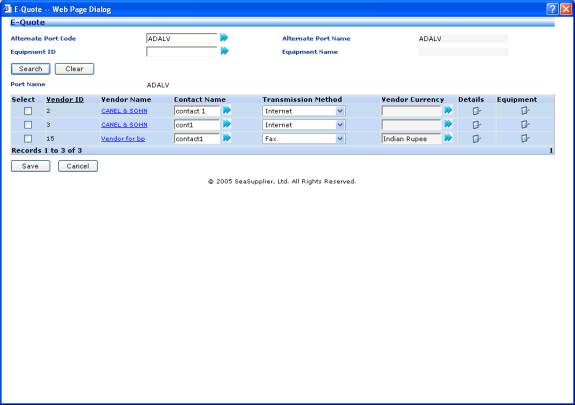
By default Equote Vendor screen displays all the vendors that have relationship with the customer and have the purchasing service and supply equipment(s) at the selected port for the particular requisition.
To search and fetch the Vendors
User can search the Vendor based on the port code and equipment id.
View and edit the following fields in grid
Vendor Id label
This indicates vendor id.
Vendor Name link button
This indicates vendor name. Click on the vendor name link button to access the vendor details popup where you can see the complete details of the vendor.
Contact Name textbox
This indicates vendor contact name. This textbox gets populated on its own if the vendor in the corresponding grid row has only one contact or has a primary contact for the delivery port code. If the vendor has more than one contact or not primary contact then click the button to the right of the textbox to access the Select Vendor Contact popup from where you can select the relevant contact name.
Transmission method Name dropdown
This indicates transmission method name. You can select transmission method from dropdown list.
Vendor Currency textbox
This indicates vendor currency. This textbox gets populated on its own if the vendor in the corresponding grid row has only one currency. If the vendor has more than one currency then click the button to the right of the textbox to access the Select Currency popup from where you can select the relevant vendor currency.
Note: Vendors having the purchasing service and relationship with customer and financial service will be displayed in the black font remaining vendors will be displayed in red font.
To Display Vendor Details
Click on the Details image button or Vendor Name link button to open vendor details popup.
To Display Equipment Details
Click on the Equipment image button to display equipments details popup.
Select vendor to generate pro-forma PO
Select the vendor by checking the check box. Click Save button to save the information and this takes you back to the Generate Pro-forma PO screen.
To cancel the operation
Click the Cancel button to cancel the operation. System will take you back to the Generate Pro-forma screen.
Generate Pro-forma PO - Change Line Accounting
Invoking the screen
To go to the screen, click the Requisition & RFQ on the main menu and select Generate Pro-forma PO – Change Line Accounting.
Main Menu > Requisition & RFQ > Generate Pro-forma PO > Change Line Accounting
It opens the Change Line Accounting screen as popup window.
Screen Layout
Figure Change Line Accounting
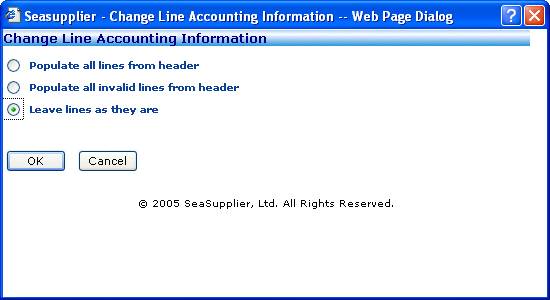
Click on Change Line Accounting link to open the change line accounting popup then select one of the following options.
Populate all lines from header
This will populate the accounting information of all the line items from the header level accounting information.
Populate all invalid lines from header
This will populate the accounting information of the line items, which contains invalid accounting information from the header level accounting information.
Leave lines as they are
This will not make any change in the accounting information of line items.
Clicking on OK button will make the changes as per the selected radio button and will close the popup.
Clicking on Cancel button will close the popup without making any changes.
Generate Pro-forma PO – Vendor Details
Invoking the screen
To go to the screen, click the Requisition & RFQ on the main menu and select Generate Pro-forma PO – Vendor Details.
Main Menu > Requisition & RFQ > Generate Pro-forma PO > Vendor Details
It opens the Vendor Details screen as popup window.
Screen Layout
Figure Vendor Details
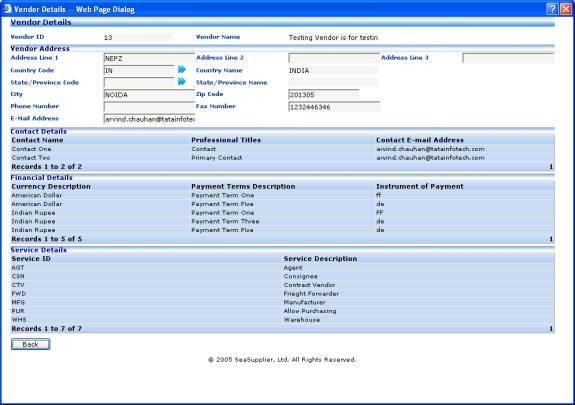
Reprice All Line Items
Click the Reprice All Line Items link button at the bottom left of the screen. This will run the contract pricing for all the line items.
Reprice All Except Manually Priced Items
Click the Reprice All Except Manually Priced Items link button at the bottom left of the screen. This will run the contract pricing for line items whose prices are not entered manually by user.
Generate Pro-forma PO – Target Price
Invoking the screen
To go to the screen, click the Requisition & RFQ on the main menu and select Generate Pro-forma PO – Target Price.
Main Menu > Requisition & RFQ > Generate Pro-forma PO > Target Price
It opens the Target Price screen as popup window.
Screen Layout
Figure Target Price
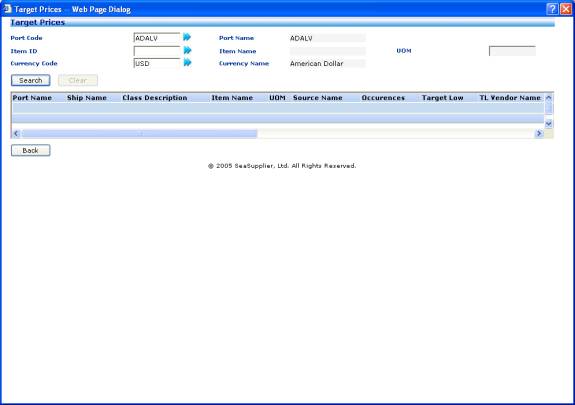
View and edit the following information in Target Price Display screen
Port Code textbox
This indicates the delivery port code and is populated on its own. Click the button to the right of the textbox to access the Search Port popup from where you can select the relevant port code or enter a value in the textbox. The popup displays all the active ports. Maximum length allowed for the field is 5.
Port Name label
This indicates the corresponding port name for the port id chosen in the earlier step. This value gets populated at the time of selecting port code from the Search Port popup.
Item ID textbox
This indicates the item id. Click on the button to the right of the textbox to open the Select Item popup from where you can select the relevant item id or enter a value in the textbox. This popup will show only items that are present in the requisition or RFQ.
Item Name label
This indicates the item name for the item id chosen in the earlier step. This value gets populated at the time of selecting item id from the Search Item popup.
UOM label
This indicates the unit of measure of the item chosen in the earlier step. This value gets populated at the time of selecting item id from the Search Item popup.
Currency Code textbox
This textbox indicates the currency code in which target price is displayed. Click on the button to the right of the text box to open the Select Currency Code popup from where you can select the relevant currency code or enter a value in the textbox. Maximum length allowed for the field is 3.
Currency Code Name label
This indicates the currency name for the currency code chosen in the earlier step. This value gets populated at the time of selecting currency code from the Select Currency popup.
Search Target Price Details
User can search the target price details based on the Port Code, Item Code, UOM or Currency Code.
The following fields are displayed in grid
Port Name
This indicates the port name.
Ship Name
This indicates the ship name.
Class Description
This indicates the class description.
Item Name
This indicates the Item Name.
UOM
This indicates the unit of measure description.
Source Name
This indicates the source name of the target price.
Occurrences
This indicates the number of occurrences of the item in calculating the target price.
Target low
This indicates amount for target low price type.
TL Vendor Name
This indicates vendor name corresponding to the target low price type.
Target High
This indicates amount for target high price type.
TH Vendor Name
This indicates vendor name corresponding to the target high price type.
TAverage
This indicates amount for target average price type.
TLast
This indicates amount for target last price type.
TLast Vendor Name
This indicates vendor name corresponding to the target last price type.
Last PO Date
This indicates PO creation date of the latest purchase order that is included in the calculation of the target price.
Last PO Number
This indicates PO number of the latest purchase order that is included in the calculation of the target price.
Last PO Line Number
This indicates the line number of the latest purchase order that is included in the calculation of the target price.
Optimum
This indicates amount for optimum price type.
To save the changes
Click the Save button at the bottom of the screen. If all the fields are valid, the system will return you to the Search Generate Pro-forma PO screen.
To Generate Proforma PO
Click the Generate PO button at the bottom of the screen to generate a pro-forma PO for the selected RFQ or requisition.
To cancel the operation
Click the Cancel button at the bottom of the screen. This will discard all the changes made on the generate pro-forma PO screen and system will take you back to the Generate Pro-forma PO search screen.